Showing posts with label tips. Show all posts

Wednesday, February 5, 2025

When to rack to a secondary

As part of my Brew Year's Resolutions, I wanted to grow the site's social media presence a bit. The Facebook page is handicapped a bit since it is marked as "Alcohol Related" which means the page can't join groups. Instead I have joined a couple groups under my personal profile, where I will occasionally share content from the site or the site's pages. 

Racking a recent batch to a secondary.

In one of these groups I recently joined, a new brewer dared to ask about racking or transferring your beer to a secondary fermenter. Racking, or transferring beer out of a primary fermenter into a secondary vessel is one of those traditional homebrewing practices that fell out of favor. Now the prevailing opinion is that racking to a secondary accomplishes very little if anything, while exposing your beer to oxygen and a greater risk of contamination. Most of the replies to this new brewer rejected the practice out of hand.

That gave me an idea to link to my post about the topic. Then I realized this is never a topic I touched on in this space. I have the Mandella Effect even with my own work sometimes.

In 2025 is there ever a need to rack to a secondary? My answer: sometimes!

Wednesday, July 26, 2023

Making great homebrew with a beer kit in a can or pouch

When I started brewing in the early 2010's, my first recipe kit came with two cans of un-hopped malt extract, some specialty malt to steep, and hop pellets to add in the boil. In that era many of homebrewers started that way. Traditionally here in the US, and especially internationally most brewers entered the hobby with an even simpler way to make beer at home: canned extract beer kits. My copy of the 3rd Edition of the Complete Joy of Homebrewing includes a chapter recipes for enhancing canned extract kits.


These canned extract kits contain pre-hopped malt extract. The extract only needs to be dissolved in water before yeast is pitched and the wort is fermented. Usually, but not always additional fermentables are required and dissolved along with the contents of the beer kit.  Then the brewer tops off with cool water to the desired batch size.

The main producers of canned extract kits currently are Coopers, Mangrove Jack and Muntons. The most widely available brand in the US is probably the Mr. Beer line of extract kits and equipment, which is produced by Coopers. Small in size and at moderate cost, Mr. Beer has been a low entry point four countless brewers.

Canned beer kits are popular in places like the UK and Canada where a pint at a pub or craft beer is relatively expensive due to taxes on alcohol. In these places a making a beer kit is a cheaper way to enjoy a beer. Beer kits are also popular in areas like parts of Asia or Eastern Europe where there is little or no craft beer available. Places where if you want anything other than a pale lager you need to brew it yourself.

Tuesday, January 17, 2023

Keeping an effective brew log - what I should have started doing from the beginning

Author David McCullough wrote all of his books on a typewriter. What makes this noteworthy is that McCullough only just passed in 2022, and his last book was published in 2019. His justification was that he never had to worry about one push of a button erasing his work. As I have gone through every published post and inserted recipes, I have noticed more missing recipes than I thought.

Brew sheet from my AHA-finalist Imperial Stout

When I started brewing in 2012, even before I started brewing my first batch, I looked for a mobile application I could use as a brew log. Back then the motto was, "There's an app for that!". At the time storing everything on an iPhone application seemed like the only way to go. Ten years later as our phones fill up with large image files, larger video files, and podcasts, many of us are removing seldom-used apps to save storage space on our devices. 

Friday, May 19, 2017

Fake Beer - the scourge of crappy internet recipes

In the wake of the 2016 election, the moral panic that is fake news sprung to public consciousness. I would argue that even more of a threat to society than fake stories about the pope endorsing Donald Trump or the Russians allegedly making up stuff about Hillary Clinton, is what I call "fake beer".

Image result for fake news

Just as the internet and social media has made it easier for people to share news, videos, and opinions it has made it easier for brewers to share recipes. That applies to commercial brewers and beer experts as well brewers who may or may not know what they are doing. There are websites like BrewToad and Brewers Friend that have tools to help brewers design and share recipes. These websites are great resources, but unfortunately they are also breeding grounds for "fake beer".

Anyone can create and share recipes on these sites. Unfortunately there is no extreme vetting going on to make sure these recipes are any good or if they conform to style. Untold numbers of these fake beer recipes are sitting in the ether, waiting to deceive a new or inexperienced brewer to find them and think they are proven recipes that are accurate representations of the style they purport to be. I shudder to think that someone might find one of my early recipes online and attempt to brew it.

One fake beer recipe I saw was supposed to be a Scottish Ale, but it called for eight pounds of dark malt extract and a late hop addition. It may actually have been a decent Brown Ale recipe, but a Scottish Ale it was not. Luckily I was able to look at the recipe and explain to the brewer what was wrong with it and suggest changes. Sadly too many brewers cling to their fake beer recipes like that one Facebook friend that still believes Barack Obama was born in Kenya.

If you are a new and/or inexperienced brewer here are some quality sources of beer recipes that will steer you clear of fake beer:

  • The American Homebrewer's Association (AHA): Every brewer should join the AHA just for Zymurgy magazine which features around a dozen great recipes in each issue. AHA members also have access to award winning recipes from the National Homebrew Competition. The AHA also publishes recipes and articles from noted craft brewers for free on its website.
  • Craft Beer and Brewing: The Craft Beer and Brewing magazine is perfect for a brewer that is also a huge craft beer fan; as the name suggests the magazine and website focus equally on craft beer and brewing. Any organization that can publish a clone recipe for Double Sunshine can be trusted.
  • Brew Your Own: BYO publishes lots of great clone recipes and articles on different beer styles. Many are available for free on their website including several of Jamil Zanichieff's recipes from Brewing Classic Styles. 
  • Brulosophy
  • Michael Tonsmeire: The Mad Fermentationist
  • Any book published by Brewers Publications: Brewing Classic Styles is the book I always reference when brewing a style for the first time or starting a new recipe. The insight into each style is at least as useful as the actual recipes. I also highly recommend Gordon Strong's Modern Homebrew Recipes. Two other titles suggested my members of the Home Brew Network Facebook group: Clone Brews and Radical Brewing
  • Experimental Brewing: Authors Denny Conn and Drew Beechum have also published books for Brewers Publications. 
  • Shut Up About Barclay Perkins: These recipes are from actual brewing logs thanks to Ron Pattinson's extensive research. A go-to resource for historic British styles. 
  • Actual breweries: Stone, Sierra Nevada, Ballast Point, and Brew Dog are just a few commercial brewers who have released actual recipes to the public. 
  • Recipe kits: The only difference between buying a kit and putting together your own recipe is that the former is pre-packaged in a box, while the latter likely leaves the shop in a bag. I think there is merit for brewers of all experience levels to brew a kit from time to time. There are lots of ingredients that I would never have tried if they weren't included in a kit. Some shops sell kits based on recipes directly from commercial brewers. 
  • Homebrew Academy: I am not too familiar with this site, but it came recommended on The Homebrew Network Facebook group. Homebrew Academy features recipes, gear reviews, and articles on brewing techniques. 
  • Beer and Wine Journal: Another suggested site I am not overly familiar with, but a quick scan of a couple of articles makes me comfortable adding it to the list. Generally if a recipe is accompanied by an article there is a better chance it is not a fake beer recipe. 
  • HomeBrewTalk*: HBT has a trove of recipes. These recipes aren't necessarily directly from commercial brewers or homebrewing luminaries, but as a message board many of the recipes have long discussion threads. In the threads other users provide feedback, and users will describe how they have tweaked the recipe over time. HBT has massive threads where users have collaborated to clone beers like Heady Topper and Westvleteren 12.
This is not to say that recipes published online by obscure or anonymous users are all worthless or all bad. With any recipe you find never hesitate to look at it with a critical eye. Do the ingredients in the recipe make sense? Will they provide the flavors that you're looking for? If it is a commercial clone recipe, do the ingredients match any information provided by the brewery itself? If the recipe includes brewer's notes that is always a plus.  

If you see something that you are sure isn't quite right or doesn't make sense, don't hesitate to change it. Even the sources I listed aren't always bulletproof. I brewed a clone of Sierra Nevada Celebration based on a BYO recipe, but I made a couple tweaks after double checking Sierra Nevada's website and my own intuition.

If you aren't sure if the recipe you are looking at makes sense or is fake beer never hesitate to ask another brewer for feedback. This is where building relationships with the staff at your local homebrew shop, making friends with people at your local craft brewery, or joining a  homebrew club can be an invaluable resource. This advice is coming from a person who abhors small talk and forced social interaction.

As I describe the threat that fake beer poses with tongue firmly in-cheek, the real threat fake beer poses is that if  new or inexperienced brewers brews one of these poorly constructed recipes and the beer doesn't come out the way they had hoped. Putting the time and effort in to brew a batch and not having it come out the way you had hoped can be discouraging to any brewer. As a community we need to do what we can to guard against other brewers making a crappy beer because they were using a crappy recipe and then losing interest in the hobby because their beer was crappy.

Beer recipes are like anything else you see on the internet, The more reputable the source, the more confidence you can have that all the ingredients in that recipe are there for the right reasons. Always approach everything you see with a degree of skepticism and evaluate it before accepting it as gospel truth.


Follow me on Twitter @JChalifour
Like The Would-be Brewmaster on Facebook
Share what beers you are drinking with me on Untappd

*Disclosure: I am a contributor at HBT

Monday, May 15, 2017

Don't carboy unprotected

At the beginning of the brewery tour at the Samuel Adams brewery in Boston, guests walk through in improvised tunnel into the brewhouse. The tunnel is actually an old fermention tank cut open on either side. The outside is white fiberglass, but the inside is actual glass. In a lot of ways glass is the best material to store or ferment beer in.

While some homebrewers invest in expensive stainless steel fermenters, the vast majority of us use glass or plastic fermenters. I prefer glass because it isn't as prone to scratching as plastic, it doesn't stain, and it doesn't absorb odor. Glass does carry a few obvious negatives. The most obvious is its susceptibility to shattering.

Related image
Every homebrewer's nightmare. Imagine cleaning that up!

A glass carboy in and of itself is awkward to pick up or carry. Carboys are even more cumbersome when filled with five gallons of beer, or are wet after being cleaned. I can't imagine dropping a carboy full of beer. Firstly, if that happened I would be very fortunate to escape injury. If I were lucky enough not to gash myself, I would then have to clean up five gallons of beer and huge shards of glass.

A long time ago I made the decision to purchase handles for every carboy I own. I won't buy a new carboy without buying a handle of some kind to go with it. For my five gallon carboys I use a coated metal handle that attaches to the neck. These work very well when trying to tilt or drag a carboy, as well as carrying empty carboys. The only issue with these types of handles is that they are not recommended for carrying the weight full carboys. The weight of a full carboy could make the nipple along the neck of the carboy snap. When my five gallon carboys are full, I will use the handle to tilt them up, reach under with my other hand and use that hand along the bottom to bear most of the weight.

All of my 5 gallon carboys have one of these handles.

When I bought my first six gallon carboy, I bought a Brew Hauler harness. The Brew Hauler loops around the bottom of the carboy and can be used to carry a full carboy. The Brew Hauler is more expensive than the orange handle. That's really the only reason I haven't bought Brew Haulers for all of my carboys. 

The Brew Hauler can carry the weight of a full carboy

Both types of handles make me feel comfortable that I won't drop a carboy. One thing that is a concern is sometimes when I move carboys they will clink against each other. Denny Conn had two glass carboys shatter this way and swore off glass forever. Glass carboys are also clear and depending on where they are stored can cause your beer to skunk by exposing them to light.  

To protect my carboys from light, I will cover them with an old t-shirt. My cellar is a who's who of old Red Sox shirseys. Going forward I am going to keep the t-shirts on all of the time to prevent glass-on-glass contact. The only time I'll take them off will be for cleaning.
.
Mike Lowell could walk into the 2017 Red Sox
lineup.
That is how I carboy safely, but that certainly isn't the only way to protect your carboys. One method I have seen used is to carry carboys in milk crates. This would seem to guard against glass-on-glass contact and would enable the brewer to carry the full weight of the carboy by grabbing the handles on the crate.

Image result for carboy milk crate
This handsome greyhound approves of his owner's safe carboy practices.

There are specialized carboy bags or carriers online and on places like Etsy that are designed to block light and to be able to carry the weight of a full carboy. Some brewers will make their own, or have a family member make their own carrier for their carboys

This homemade cover/carrier looks cozy enough to sleep in.
If imagining cleaning up five gallons of beer and shards of glass isn't enough to make you want to protect your carboy I don't know what to tell you. It reminds me of some of the insurance customers I talk to who think carrying the bare minimum coverage limits is sufficient because they "have never had an accident". Not protecting your carboy is irresponsible and unsafe. That is to say noting about potentially losing a batch to a shattered carboy. It is a stupid risk to take.

When handled safely, glass is vastly superior to plastic as a fermentation. I have been planning to phase out my plastic buckets and replace them with glass carboy. This winter I did buy two new plastic buckets for the sole purpose of saving a few dollars. When I had to recently dump a batch, that was my final straw. 

I recently purchased two six gallon carboys from another brewer who upgraded to stainless steel colonials. I sold one to a friend who recently dropped a carboy and lost a batch. That gives me two six gallon glass carboys that I can use as primary fermenters for five gallon batches. Even if I have a double brew day I can ferment in glass. In addition to that I have five, five gallon carboys I can use for secondary fermentation and/or long term aging. I can also use one of those as a primary fermenter for my three-gallon BIAB batches

I am now a 100% glass man! The only plastic that will be touching my beer will be tubing, siphons, and bottling equipment. My hope is going all-glass in the cellar, replacing my plastic racking and bottling equipment more regularly, and doubling down on my cleaning and sanitation (in particular my bottles), that I will have clean beer every time. That means avoiding batches that I know are bad right away, as well as the slower-acting infections that have seemed to plague my brewhouse over the years. 

Follow me on Twitter @JChalifour
Like The Would-be Brewmaster on Facebook
Share what beers you are drinking with me on Untappd

Tuesday, May 9, 2017

Keeping up with trends: Brewing "New England Style" pale ales and IPAs at home

Keeping up with trends will be a monthly look at trends in the craft beer scene and how it relates back to homebrewing. Published for Homebrew Talk. See the original story here

Whether "New England Style" (NE style) pale ales and IPAs are in fact new styles is a matter of some debate. While there are breweries outside of New England and even the northeast, the style is most prevalent in New England.  What isn't debatable is the impact these beers are having on the marketplace as large national and regional craft brewers are losing market share to smaller brewers. Wachusett, a venerable regional craft brewer with roots going back to 1994 is getting into the game releaseing their own NE style IPA called Wally.

An open-fermented NE IPA I brewed with 1187. It was amazing
until the batch got infected. Perils of open fermentation...
Even more than any other IPA, freshness is key with NE IPAs. The hop aroma and flavor the style is known for can fade quickly. This gives smaller NE IPA producers have a huge advantage over larger brewers. Tree House and Trillium typically sell their beer the same day, or no more than a few days after it is canned. Customers line up, and more often than not that day's allotment of cans sells out. Producers of the style who distribute like Maine Beer Company are judicious in their allotments to retailers to ensure the beer doesn't sit for too long.

In contrast, Founders tells retailers that All Day IPA is fresh up to 120 days from packaging date. The beer is in cans, and if stored cold the beer probably is perfectly fine. However if a discerning buyer checks the date of All Day IPA or another national brand, and then checks the date of a smaller local producer, which one will the customer choose?

As homebrewers we enjoy a similar advantage when it comes to freshness. If you are the type of brewer that will brew a five gallon batch, and keep it on tap for several months as you slowly drink it, NE IPA might not be the best style for you to brew. When I brew NE pale ales and IPAs I usually brew smaller batches, or I'll brew it for a special event where I know the beer will be kicked.

If you are bottle conditioning a NE IPA, add even more dry hops to the beer to compensate for the hop character you will lose while the beer conditions. Kegging is preferable to bottling if you can keg. Some brewers will dry hop in a keg, and use CO2 to push the beer to a separate purged serving keg to avoid exposing the beer to oxygen.

Compared to West Coast IPAs where all of the character in the beer is from the hops, NE IPAs can be a bit more broad and complex. There are certainly many commercial examples of NE IPA that use regular US 2-row malt and Chico yeast, but there are also examples that use more flavorful British base malts and estery yeasts. Any malt and yeast character should still be in the background, but there is room for interpretation. If you do a side-by-side tasting of  The Alchemist's Heady Topper and Lawson's Finest Liquids' Sip of Sunshine, that will give you an idea of the breadth of the style.

As a hop forward style, crystal malts should not be used, or used in very small quantities. If you have a house IPA recipe and want to convert it to a NE IPA, replacing the crystal malt with flaked wheat, barley, or oats is a good start. The flaked grains will provide the body and head retention that crystal malt would have, but without a cloying sweetness. A small amount of Munich malt can also be used to add color and a bit of malt flavor.

If brewing a NE IPA with extract, I wouldn't suggest using flaked grains unless you are going to do a partial-mash. A grist of 95% Golden Light extract and 5% corn sugar will approximate the body and mouthfeel of the style. Subbing out a can of light extract with wheat liquid extract wouldn't be a bad idea either. If employing a partial boil, make sure to utilize a late extract addition  to ensure proper hop utilization and guard against kettle carmelization.

More than anything else the style is known for it's hazy appearance. When John Kimmich designed Heady Topper he didn't try to make a hazy beer. He wanted to make the best IPA he could, and it just happened to be hazy. Backlash brewed their Ricochet IPA with and without biofine, and brewer Helder Pimintel found he greatly perfected the hazier batch. When brewing a NE IPA at home hold off on the whirlfloc. Irish moss, biofine, gelatin, or isinglass.

For hop selection, the newer hops with more of a stone fruit-type flavor and aroma are excellent choices. In particular the new hop varieties coming out of the US and Australia like Mosaic, Equinox, Azacca, Nelson, and Vic Secret. That doesn't mean a homebrewer you should be married to the latest and greatest hard to find hops. Last summer I brewed a wonderful NE IPA using only free hops I brought home from HomebrewCon: Pekko, Idaho 007, and Triple Perle.

Many of the prominent NE IPA producers started as exceedingly small operations. As such, they didn't have the ability to contract for every hop they wanted. Noah Bissell designed Bissell Brothers' flagship IPA The Substance specifically to use less sought-after hop varieties that he knew they could get. Noah emailed me the recipe in 2014, and I posted the recipe on the HBT recipe database.  Hop availabiliy is why commercial brewers use complex blends of hops. If one of seven hops used in a recipe isn't available and needs to be substituted, the change in flavor should be far less noticeable. It is also  why brewers have rotating IPA series like Night Shift's Morph.

More critical than hop selection is the timing of the hop additions. A very small bittering charge at 60 minutes or a first wort hop addition is all you need before flameout. The idea is to have just enough hop bitterness to supply balance without producing a bitter beer.. Commercial brewers will then add hops after flameout during the whirlpool stage. A homebrewer can use pumps to recirculate the wort to create a whirlpool. A stir with a spoon can also work. You will extract some bitterness from the whirlpool hops. BeerSmith gives you as good of an estimate as you can get of exactly how much bitterness you are getting from the whirlpool additions.

Dry hopping is everything in this style. In particular what Michael Tonsmeire describes as biotransformation. Contrary to previous orthodoxy, dry hopping during active fermentation is critical. The way the dry hops interact with the fermenting yeast gives the beer its "juicy" hop flavor. I advise everyone I talk to who is brewing the style to add 1/3 to 1/2 of their dry hops during active fermentation to obtain the haze and juicy hop flavor the beer is supposed to have. The rest of the dry hops can be added 5-10 days before packaging to punch up the hop aroma.

A NE Pale Ale brewed with 1084.
One of the mythical aspects of the style was the Alchemist's "Conan" yeast strain. Before several small yeast labs propagated Conan, home brewers who made the trek up to northern Vermont would culture Conan from cans of Heady. Conan with it's high attenuation leaves plenty of yeast in suspension. It also has a wonderful peach ester profile which compliments the hop flavor perfectly.

The other popular yeast used in NE IPAs is Wyeast 1318 London Ale III. My first experiences with 1318 I brewed bitters, milds, and old ale and a milk stout. Used in traditional English styles 1318 leaves a beautifully clear beer. There is something about how the yeast interacts with dry hops that it stays in suspension and leaves a hazy NE IPA. Always known for it's fruity esters, 1318 with it's moderate attenuation leaves a nice soft mouthfeel that is another hallmark of the style. I work one day a week at a LHBS in Cambridge, Mass, and every week it is a struggle to keep 1318 in stock.

As with the hops, there isn't a need to be married to these sought-after yeasts. Plenty of commercial brewers still use Chico to make NE IPAs. I have personally used Wyeast 1084 Irish Ale and 1187 Ringwood Ale and found that both worked really well.

In my experience the beer should finish with an FG of 1.010 to 1.015 to have the soft mouthfeel it needs. When selecting your yeast, you may need to adjust your mash temperature and  percentage of flaked adjuncts to finish in that range. The last time I used Conan in a regular-strength IPA, 25% of my grist was flaked adjuncts and I mashed at 152F. The recipe below is using Chico, so my grist is only 16.4% flaked wheat, and I am mashing a little bit lower.

The other contributor to the soft mouthfeel is water. Conventional wisdom is that sulfates in water accentuate hop character, while chlorides accentuate malt. When brewing a traditional IPA a 3:1 ratio of sulfates to chlorides was the rule of thumb. With a NE IPA, that orthodoxy is flipped on its head. I've played around with ratios of 2:1 and even 1:1. A friend in my homebrew club brewed the closest NE IPA to Tree House that I have ever tasted. He knows far more about water chemistry than I do, and in that beer he used a ratio of 1:3 sulfates to chlorides. Also when using this many pale malts monitoring the pH of your mash is also critical.

Luckily my municipal water is high in chlorides. I am going to try that 1:3 ratio here. This is a bit of a kitchen sink brew. Based on a previous recipe, I tweaked it to use up leftover ingredients from previous batches. I also grabbed a couple of hops from my LHBS' "experimental" section. As a last minute brew day, Safale S05 from Fermentis should do the trick:

Queue Juice

American IPA (14 B)

Type: All Grain
Batch Size: 3.15 gal
Boil Size: 4.80 gal
Boil Time: 60 min
End of Boil Vol: 3.80 gal
Final Bottling Vol: 3.00 gal
Fermentation: Ale, Single Stage
Date: 20 Feb 2017
Brewer: Jason Chalifour
Equipment: 3 Gal BIAB (8g kettle)
Efficiency: 70.00 %

Mash Ingredients
Amt Name Type # %/IBU
6 lbsBrewers Malt 2-Row (Briess) (1.8 SRM)Grain671.6 %
1 lbs 6.0 ozWheat, Flaked (1.6 SRM)Grain716.4 %
1 lbsBorlander Munich Malt (Briess) (10.0 SRM)Grain811.9 %
Mash Steps
Name Description Step Temperature Step Time
SaccharificationAdd 22.06 qt of water at 157.4 F150.0 F75 min
Mash OutHeat to 168.0 F over 7 min168.0 F10 min
First Wort Hops
Amt Name Type # %/IBU
0.25 ozBravo [15.80 %] - First Wort 60.0 minHop922.2 IBUs
0.25 ozTopaz [16.10 %] - First Wort 60.0 minHop1022.6 IBUs
Steeped Hops
Amt Name Type # %/IBU
0.25 ozBravo [15.50 %] - Steep/Whirlpool 15.0 minHop114.9 IBUs
0.25 ozEquinox (HBC 366) [13.40 %] - Steep/Whirlpool 15.0 minHop124.2 IBUs
0.25 ozMosaic (HBC 369) [11.00 %] - Steep/Whirlpool 15.0 minHop133.5 IBUs
0.25 ozTopaz [16.10 %] - Steep/Whirlpool 15.0 minHop145.1 IBUs

Dry Hop/Bottling Ingredients
Amt Name Type # %/IBU
0.75 ozEquinox (HBC 366) [15.00 %] - Dry Hop 15.0 DaysHop160.0 IBUs
0.75 ozMosaic (HBC 369) [12.25 %] - Dry Hop 15.0 DaysHop170.0 IBUs
0.50 ozBravo [15.50 %] - Dry Hop 15.0 DaysHop180.0 IBUs
0.50 ozTopaz [16.10 %] - Dry Hop 15.0 DaysHop190.0 IBUs
0.25 ozHBC 438 (Experimental) [16.60 %] - Dry Hop 15.0 DaysHop200.0 IBUs
2.00 ozMosaic (HBC 369) [12.25 %] - Dry Hop 5.0 DaysHop210.0 IBUs
1.00 ozBravo [15.50 %] - Dry Hop 5.0 DaysHop220.0 IBUs
1.00 ozEquinox (HBC 366) [15.00 %] - Dry Hop 5.0 DaysHop230.0 IBUs
1.00 ozTopaz [16.10 %] - Dry Hop 5.0 DaysHop240.0 IBUs
0.75 ozHBC 438 (Experimental) [16.60 %] - Dry Hop 5.0 DaysHop250.0 IBUs

L-R: First wort hops, whirlpool hops, first dry hop,
second dry hop which includes the hops still in the package
I will add the first dry hops two to three days after pitching my yeast. The second dry hops will be added five days before bottling.

Follow me on Twitter  @JChalifour
Like  The Would-be Brewmaster on Facebook
Share what beers you are drinking with me on  Untappd

Wednesday, March 22, 2017

Kräusening, never again! At least probably never again

There are some practices employed by commercial brewers that aren't necessarily practical for homebrewers. There are also traditional methods that were employed for various reasons that no longer make sense with modern brewing methods and ingredients. Kräusening arguably fits both.

Kräusening is the process of adding actively fermenting wort, at high kräusen, to an already fermented beer. German brewers bound by the reinheitsgebot couldn't use priming sugar to package their beer would frequently use this method. In addition to helping carbonate packaged beer, the most obvious is you can top off a batch with the fermenting wort. My original impetus to try kräusening was when my Anti-Chris and Sour-Chris both finished under five gallons.

Kräusening when the beer is conditioning in a secondary fermenter had and is said to have other benefits: the active yeast can help ensure a full attenuation and/or jumpstart a stuck fermentation, the active yeast can clean up off-flavors (which is why Budweiser is kräusened), and it can help reduce oxidation.

In a pale, dry, high gravity beer like Anti-Chris, all of these benefits are appealing. Last summer, the only beer out of the four I brewed for my US of IPA project that I racked to a secondary was Broken Fist. At Jamboree Dave from SoMe Brewing sampled Broken Fist off a keg and noticed it was oxidized. The portion of the batch that I bottled were even worse over time. The beer took on an ashy hue, while the hop flavor was flat and generally unpleasant. A big, boozy beer like Anti-Chris will need to condition in a secondary fermenter.

For a commercial brewer that brews the same beer often, kräusening can be fairly easy. It is as simple as rigging up a hose from a batch that is actively fermenting and topping off a batch in another tank. For a homebrewer it is not that simple.

The easiest way, and only way I could see myself ever kräusening again, is to boil a small amount of dry malt extract, pitching some yeast, and add to your carboy after a day or two. Another option that seems workable is to set aside a portion of wort and yeast from brew day, seal them, and then pitched the saved yeast into the same wort after you rack the main batch to a secondary, and then blend back in.

I didn't have the foresight to do the latter. Even if I did, I would be scared of contamination. Not wanting to alter my original recipe, I didn't want to go with the DME route. What I ended up doing was brewing a mini-batch of Anti-Chris, pitching yeast, and then using it to top off the other batches.


I shot for a two gallon mini-batch. Both beers I was kräusening already had ample hop bitterness. I thought it would be fairly easy to do a small BIAB mash, boil my wort for 15 minutes just to ensure it was sterile, and pitch my yeast. 

Unfortunately Anti-Chris employed a 90 minute mash, plus a 15 minute mashout. In addition to those steps, the time it took to heat my strike water, and time to cool the wort, the mini-batch took almost as long as a regular batch. While I was mashing i racked Anti-Chris to a carboy. 

I pitched my yeast and after 12 hours there were signs of active fermentation. At around 24 hours I poured the fermenting wort into the carboy of Anti-Chris to top it off. In hindsight I really should have gently racked the beer with a siphon. Pouring the beer as I did only introduced more oxygen. Hopefully the active yeast gobbles it all up. 

My initial batch was really close to 5 gallons.

After pouring there was a thick krausen at the
top of the fermenter. It quickly subsided.

After 18 hours a new layer of krausen emerged.
Hopefully it takes care of the oxygen I needlessly
introduced.

Adding the wort to a carboy allowed me to monitor what was going on inside the vessel. My mini batch ended up at only 1.5 gallons. I probably blended in at most 0.25 gallons into Anti-Chris. The rest went into Sour Chris. As Sour Chris is still in a plastic bucket, I couldn't see exactly what was going on, but there was plenty of airlock activity. The mini-batch should boost the overall ABV of Sour-Chris.

We'll see in another six weeks when Anti-Chris is ready to drink if this was worth the effort. We will also see if I unnecessarily infected, oxidized, or otherwise altered the flavor of the beer. I did have a small sample before racking. It was dry, bitter, and some of the hop flavor was present. with some time to let the hop bitterness mellow it seemed like it was on its way before I dumped this extra fermenting wort in there.

While working on this, I did settled on the blend of dry hops I plan to add.  I am going to bottle the Anti-Chris and Pasteinator the weekend of April 15-16. That will give both beers three weeks to condition in the bottle before our club's competition.


Follow me on Twitter @JChalifour
Like The Would-be Brewmaster on Facebook
Share what beers you are drinking with me on Untappd


Monday, February 27, 2017

New Toys: Aquarium Pump

I purchased an aquarium pump with an air filter at Modern Homebrew Emporium. Yeast is a living organism. Technically it is billions of living organisms. Those billions of tiny yeast cells ferment the sugars in wort into alcohol and carbon dioxide to make beer. As with most living organisms yeast needs oxygen. A wort without sufficient oxygen will not attenuate fully.  One of the consequences of boiling wort is that most of the oxygen in solution is boiled off. 


Boiling off oxygen in extract or partial-mash brewing is a bit of a non-issue when only doing a partial-boil. The top off water should have plenty of oxygen still in solution. Aerating the wort becomes more imperative when doing a full boil. In my case that is when I brew three gallon batches at home, or when Andy and I brew five to ten gallon batches. 

The air we breath is mostly hydrogen and only around 21% oxygen. You can introduce some oxygen to your wort by agitating your fermenter, splashing the wort when you transfer it to your fermenter, running your wort thru a strainer, or otherwise agitating it. 

For awhile I used pure oxygen. I purchased an oxygen regulator, oxygen tank, and diffusion stone to oxygenate my beers.

Image result for oxygen regulator brewingImage result for oxygen regulator brewing

This setup worked decently enough. Having to go to a big box home improvement store to buy the oxygen tank was a minor inconvenience. Unfortunately by the time my tank was empty the regulator had rusted onto the empty tank. When this happened I decided to try the aquarium pump.

No tanks are needed, just plug the little guy in and let him pump away! The air filter makes sure contaminants in the air aren't pumped and diffused into your beer. As long as I take reasonable care of the thing this is a one-time purchase other than replacing the filter one a year or so. 

The main advantage to the tank is that it is pure oxygen. The tank with regulator does not take as much time to diffuse the wort as the pump. With the tank I would let it rip for anywhere from 30 seconds to two minutes. The instructions that came with the pump suggested leaving it in for 30 to 120 minutes.

I used the pump for the first time the other day. I didn't mind the time it took. Once I cooled down my wort and transferred it to the fermenter, I plugged in the pump and let it do it's job while I finished cleaning

A propperly aerated wort will start fermenting more quickly than a wort that isn't. My first batch was going within 12 hours. That's even more impressive since I was using dry yeast. So far, the pump feels like a solid investment. 

See Oxygen - How to Brew

Follow me on Twitter @JChalifour
Like The Would-be Brewmaster on Facebook
Share what beers you are drinking with me on Untappd

Friday, January 20, 2017

Rediscovering the mixed 12-pack

A friend of mine who works at a bottle shop recalled a conversation she had with a local brewery rep. The rep was quite excited that his brewery's new double IPA was moving from 22 ounce bombers, to six-packs of 12 ounce bottles. My friend told the rep that his brewery really needs to package their double IPA in four-packs of 16 ounce "tall boy" cans. He slumped and sighed to my friend "I know."

Cans have numerous advantages over glass bottles. More and more craft brewers are moving to cans, while newer brewers are launching exclusively in cans. For New England-style IPAs, the four-pack of tall boys is becoming ubiquitous. A four-pack of Night Shift cans usually retails for around $14, while four-packs of Trillium range anywhere from $15-$20.

To put this in perspective, 23 year-old me was accustomed to paying $20 for a "30 bomb" of Budweiser cans, while 28 year-old me would pay $15 for a 12-pack of a Samuel Adams seasonal brew. Now 34 year old me is paying $15 for a 4-pack of tall boys. As much as I love a four pack of a local IPA, there is something to be said for spending the same amount of money on a 12-pack every once in awhile. Especially when it feels like you're dropping $40-$50 every time you go to your local bottle shop or taproom. 


Over the last couple of months I've picked up mixed 12-packs from New England stalwarts Samuel Adams, Harpoon, and Smuttynose. In addition to the greater bang for the buck a 12-pack provides, a mixed twelve pack includes three to six different beers. 

The Samuel Adams and Harpoon packs included some new beers I tried for the first time. Harpoon in particular had some very strong releases in 2016. I really enjoyed Camp Wannamango, Flannel Friday, and UFO Winterland. The Vanilla Porter in their winter pack is another winner. All three gave me a chance to revisit old favorites like Finestkind IPA, Old Fezzewig, and Boston Lager.

As a homebrewer who mostly bottles his beer, an advantage to buying a 12-pack of bottles that can't be overlooked are the bottles and boxes. We used to have more bottles than we knew what to do with, but with so many beers we buy now coming in cans that leaves me less bottles to peel and wash before using to bottle my own beer. The boxes the bottles came can be reused to box up my beer. 

My recent run of 12-pack purchases allowed me to work in some fresh bottles. No matter how carefully I rinse my bottles after use, sometimes there is too much gunky buildup inside a bottle. Like anything else if a bottle isn't clean it isn't sanitary. A bottle that isn't clean can lead to infected beer. It is important to rotate in fresh bottles to replace the grimy old ones. 

Since I've been working Saturdays at Modern Homebrew Emporium and contemplating the next steps in my brewing, I've been brewing a lot more. These new bottles will be needed! As brewers transition from winter to spring beers, I might need to pick up another 12-pack or two. 

Follow me on Twitter @JChalifour
Like The Would-be Brewmaster on Facebook
Share what beers you are drinking with me on Untappd

Monday, December 28, 2015

Dry Yeast vs liquid yeast


Like glass versus plastic equipment, there are pros and cons to using dry yeast or liquid yeast. I eluded to some of them when I purchased my stir plate.

No shortage of yeast options.

Most brewers start with dry yeast because it's the easiest to work with. The instructions on the sachet say to sprinkle the yeast onto the wort and call it a day. Most brewers, myself included re-hydrate their yeast. Essentially you add the yeast to some water about half an hour before pitching the yeast. This gives the yeast time to reconstitute itself into it's natural, liquid form before devouring all the sugars in the wort.

Wednesday, August 12, 2015

Hoarding your "sponge-worthy" beer

When Elaine from Seinfeld's contraceptive of choice, the sponge, was removed from the market she went out of her way to buy as many sponges as she could find. She then thoroughly vetted every potential sexual partner to determine if he was "sponge-worthy", less one of her precious sponges be wasted on a beau who was not sponge-worthy.


My uncle Dave loves Samuel Adams Cold Snap and stocked up on it while it was still on store shelves. He and a buddy of his made the sponge-worthy analogy when deciding when to enjoy one of their stash.  Although Cold Snap is Sam's spring beer and it is released in January, Cold Snap is actually a really good beer to enjoy during the summer. Witbier is light, refreshing, and has a bit of citrus flavor. That's what I tell people about Plum Island Belgian White when I pour for Newburyport. Dave finally enjoyed the last of his Cold Snaps at a sponge-worthy beach day a couple of weeks ago.

Thursday, July 9, 2015

Extract versus All-Grain Brewing

As an intermediate to advanced brewer, I probably brew with malt extract more than most other brewers of a similar level of experience. A lot of it has to do with the limitations of brewing on an electric stove inside a one-bedroom apartment. The only all-grain, full boil batches I brew are with my cousin/brewing partner Andy every couple of months. At home I can brew one or two gallon all-grain batches on my stove top using the brew-in-a-bag (BIAB) method

LME
Malt extract is not without it's benefits.

For my full, five gallon batches I brew at home I typically use a partial-mash method where I mash about one-half to two-thirds of my fermentable sugars, and top off with malt-extract and/or other sugars to make sure I have enough fermentable sugars for the yeast to convert into alcohol.

Tuesday, June 9, 2015

Three brews for the price of one

So much to brew, so little time. I have at least a dozen beers I've been meaning to brew, but haven't. I have recipes saved that I developed months and even years ago that I haven't brewed. Split batches are a great way to make multiple beers at the same time. A brewer can split a batch at almost any point in the process. Brulosophy conducts several experiments by splitting batches and only changing one variable.

The beauty of split-batches.


After mashing and sparging you can split the wort and do separate boils with entirely different hop schedules, brewers can split the batch after the boil and pitch more than one type of yeast. or as I did this weekend you can split a batch after primary fermentation. Curly's Milk Stout was in the primary fermentation vessel for three weeks and was ready to be racked into a secondary vessel. This was the perfect time to split the batch and make my coffee and chocolate variants.

Wednesday, April 29, 2015

Bottle bombs and gushers, hazards of homebrew

Last night I was trying to relax after a rough day at the office. I was startled by a loud pop that almost sounded like an explosion. It turns out a bottle of leftover Pennant Race Pumpkin Wheat blew up worse than Clay Buchholz blew up on the mound.


This is aptly called a bottle bomb. It is the worst case scenario when you bottle condition, or naturally carbonate your beer inside the bottle. Luckily my bottle bomb from last night was contained inside a 12-pack box located on a landing. All in all it was like a Wade Miley start: scary but mercifully quick.

Wednesday, January 14, 2015

Carbonation can make or break your beer

Nobody likes a flat beer. In my (misspent) younger days I would frequently post-game (continue drinking) after closing the bar (being dragged out of an establishment by an employee of said establishment). I'd crack open a beer after 1:00 a.m. and more often than not pass out before I could finish. I'd wake up in the morning to a flat beer in the fridge that I decided to save for some reason. Finishing a leftover beer like that was never pleasant, but felt like a necessity.

IMG_0712.JPG

A flat beer is just that flat, a dull, lifeless beverage. Carbonation along with the body of the beer are the two contributors to the mouthfeel of a beer. The textural attributes of a beverage in your mouth along with aroma and flavor are what makes the drinking experience.


A beer with a high level of carbonation will impart a perception of dryness in the finish. This is important in pale and malty styles like saison or witbier to ensure the finish isn't cloyingly sweet. High levels of carbonation can also enhance the aromatics as the bubbles rush to the surface, and the high level of carbonation leads to a thick frothy head like in a German weizen.

A beer with a low carbonation level can have more of a creamy texture and a smoother finish. That can also enhance the more subtle malt and hop flavors. British and Irish styles, especially real ale served on cask have very low levels or carbonation and are served at cellar temperatures. These styles frequently have enough hop flavor or malt character to balance out the finish.

Broadly speaking different styles have different levels of carbonation. As a homebrewer who bottles, the way to adjust carbonation levels is to adjust the level of priming sugar, usually corn sugar (dextrose) added at bottling. For brewers who keg the key is adjusting the pressure from the CO2 tank.
I gave one of my Hot Stove Porters to a friend who had also had The Sustenence. The Sustenence was over-carbonated to the point where it had to be poured very slowly. Even then the beer was still quote foamy. When he had the Hot Stove Porter one of the first things he said was that the carbonation level was perfect. I went for a lower level of carbonation to enhance the roasted malt flavors. There was enough hop flavor and roasted malts to make sure the finish wasn't overly sweet.

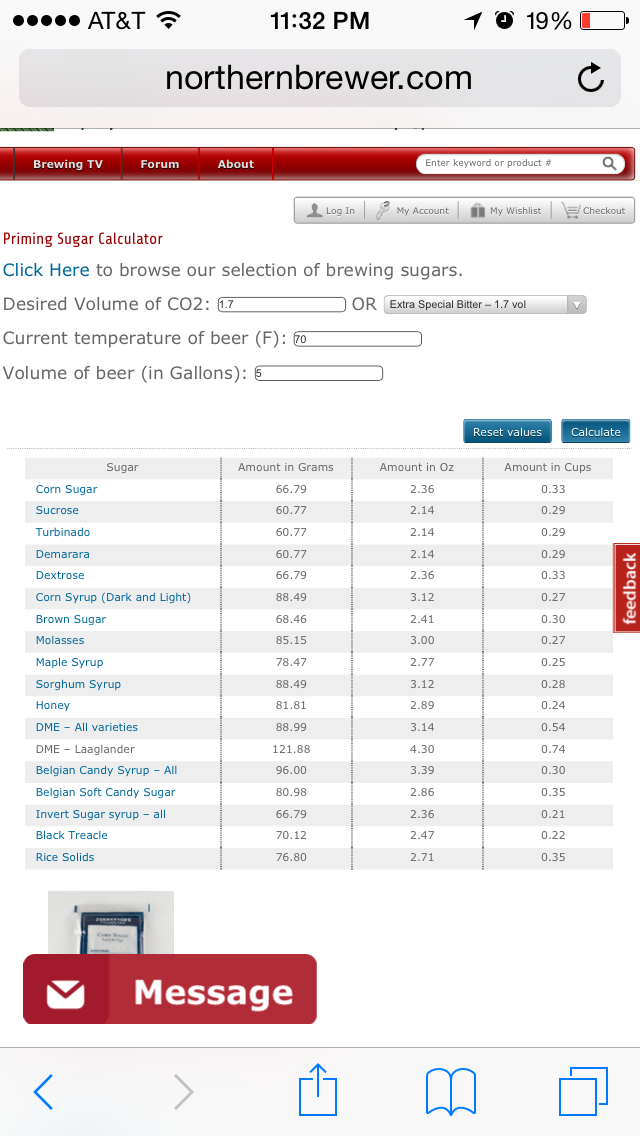
Websites like Northern Brewer and Tasty Brew have calculators that make it very easy to know how much priming sugar to add to reach the desired level of carbonation. The standard level of priming sugar to add to a five gallon batch of beer is 4-5 oz. For most common styles like an American Pale Ale, assuming the wort is at room temperature, this works perfectly well. Homebrew shops sell pre-measured packets to boil in water and add to the wort on bottling day. Recipe kits often come with one of these packets thrown in regardless of  the style of beer.

The Welkin Ringer ESB kit from Beer and Wine Hobby that I brewed a few weeks ago came with one of these packets. English Bitters, even bottled as opposed to cask versions have low levels of carbonation. Reviews from Beer Advocate indicated the real version from Mystic Brewing had low to medium-low carbonation. When I plugged in the wort temperature, desired carbonation level and volume into the Northern Brewer calculator here was what it recommended:

IMG_0711.PNG
When naturally carbonating, be sure to adjust your priming solution.

I added the priming sugar the calculator recommended which was about half the volume of sugar in the packet. It also tells you how much volume of other types of sugars to use on bottling day. This came in handy when I felt the Ground Rule Double was too light and I decided to use Dark Candi Sugar to prime my bottles to add a little more color to the finished beer.

Weighing priming sugar on a scale is usually preferable to measuring with measuring cups because it is more exact. Since the calculator suggested adding 0.33 cups to the Welkin Ringer ESB, exactly 1/3 of a cup, I measured my priming sugar out of laziness. That is actually less than I used for the Hot Stove Porter so the carbonation should be lower. The finished beer should have enough hops and specialty malts to still have decent head retention.

Proper carbonation is a small change that can make quite a difference. It certainly can help your beer taste more like a commercial beer than a homebrew.

Follow me on Instagram  @wouldbebrewmaster
Like  The Would-be Brewmaster on Facebook 
Share what beers you are drinking with me on Untappd

Friday, October 31, 2014

How to brew beer at home

This Saturday is Learn to Homebrew Day. As regular readers of this page will know, we planned on having a Learn to Homebrew Day event, but it was eventually cancelled due to a forecast with a 90% chance of rain and 23 MPH winds.  Kind of makes brewing outside problematic.

The plan was to brew a 10 gallon, all-grain batch of a special beer I came up with last year in honor of our grandfather who died after a long battle with Parkinson's.  We would have been using equipment and techniques including a mash-tun, a large boil kettle, propane burner, grain mill, wort chiller and a huge yeast starter that would be a bit much for a first time brewer. In the spirit of Learn to Homebrew Day, I decided to develop a simplified version of the recipe that requires nothing more than a basic starter kit you can pick up at a local hombrew shop like Beer & Wine Hobby or online, and other items most people have in their kitchen already.

When I started the blog I decided early on not to make this a "how to" type of blog. John Palmer and Charlie Papazian are infinitely more qualified than I am to teach and explain the brewing process. Instead I took a similar approach to James Watt and Martin Dickie on the TV show Brew Dogs. Watt and Dickie brew what they brew, and if there is a process or concept that they feel warrants additional explanation, they will explain it as they go. That is what I have always tried to do considering that the blog is hosted on a newspaper website and most of my Facebook fans aren't homebrewers.

Friday, October 24, 2014

New toys! Yeast stir plate

Just like my grain mill and wort chiller, this should be a lifetime investment that will improve the quality of my beers immediately and as long as I brew. After doing a couple yeast starters for recent batches, and only using yeast that has never been used in another full batch, I have found that doing it is not as much of an inconvenience as I thought and I think it will lead to better beer.

IMG_0581.JPG
No more 1 gallon yeast starters!

Let's start at the beginning. Yeast are living beings like us, and as such they need oxygen. The more oxygen they have, the healthier the fermentation, and the more the yeast will reproduce additional cells. For a healthy fermentation of your wort you need to make sure that you pitch (add) enough healthy yeast cells. If you don't have enough yeast you may experience: infected finished beer, higher than normal final gravity, excess production of objectionable flavors caused by fusel alcohols, esters, diacetyl and sulfur compounds. I assure you all that stuff is bad.

Friday, October 3, 2014

Sanitation is godliness

Beer is a living thing. If it's not quite a living thing, it is made by living things. I am not talking about human beings either. Our beloved potent potable made from fermented grain would not exist were it not for fragile, single cell organisms called yeast. After the yeast is pitched into the beer they go into a frenzy of constant eating and procreation. Is that living the dream or what?

IMG_0340.JPG
Always within arm's reach. I wouldn't be shocked if Andy slept with it under his pillow.


As the yeast digest the fermentable sugars and produce alcohol and CO2, it needs to be protected from other organisms that want to do the same thing. Sanitation is how we as brewers protect our friends, the yeast, from other organisms that threaten to crash the party that is fermentation.

Tuesday, September 23, 2014

Paper, erm... glass or plastic? The eternal debate...

At the grocery store it was a decision I could never make. I leaned toward plastic because I could carry more at once. My home is perpetually overrun with leftover plastic bags. I like the idea of reusable cloth bags, but I can never remember to bring the damned things with me to the store.

fermenters1
In life there are only trade-offs. 

In the homebrewing community a similar debate rages between brewers who prefer plastic or glass fermentation vessels. Like so many other things in life there are pros and cons to both. It is a matter of personal preference. My first kit came with a plastic primary fermentation bucket and a glass carboy to use for secondary fermentation, so I have used both from the beginning.

Monday, September 8, 2014

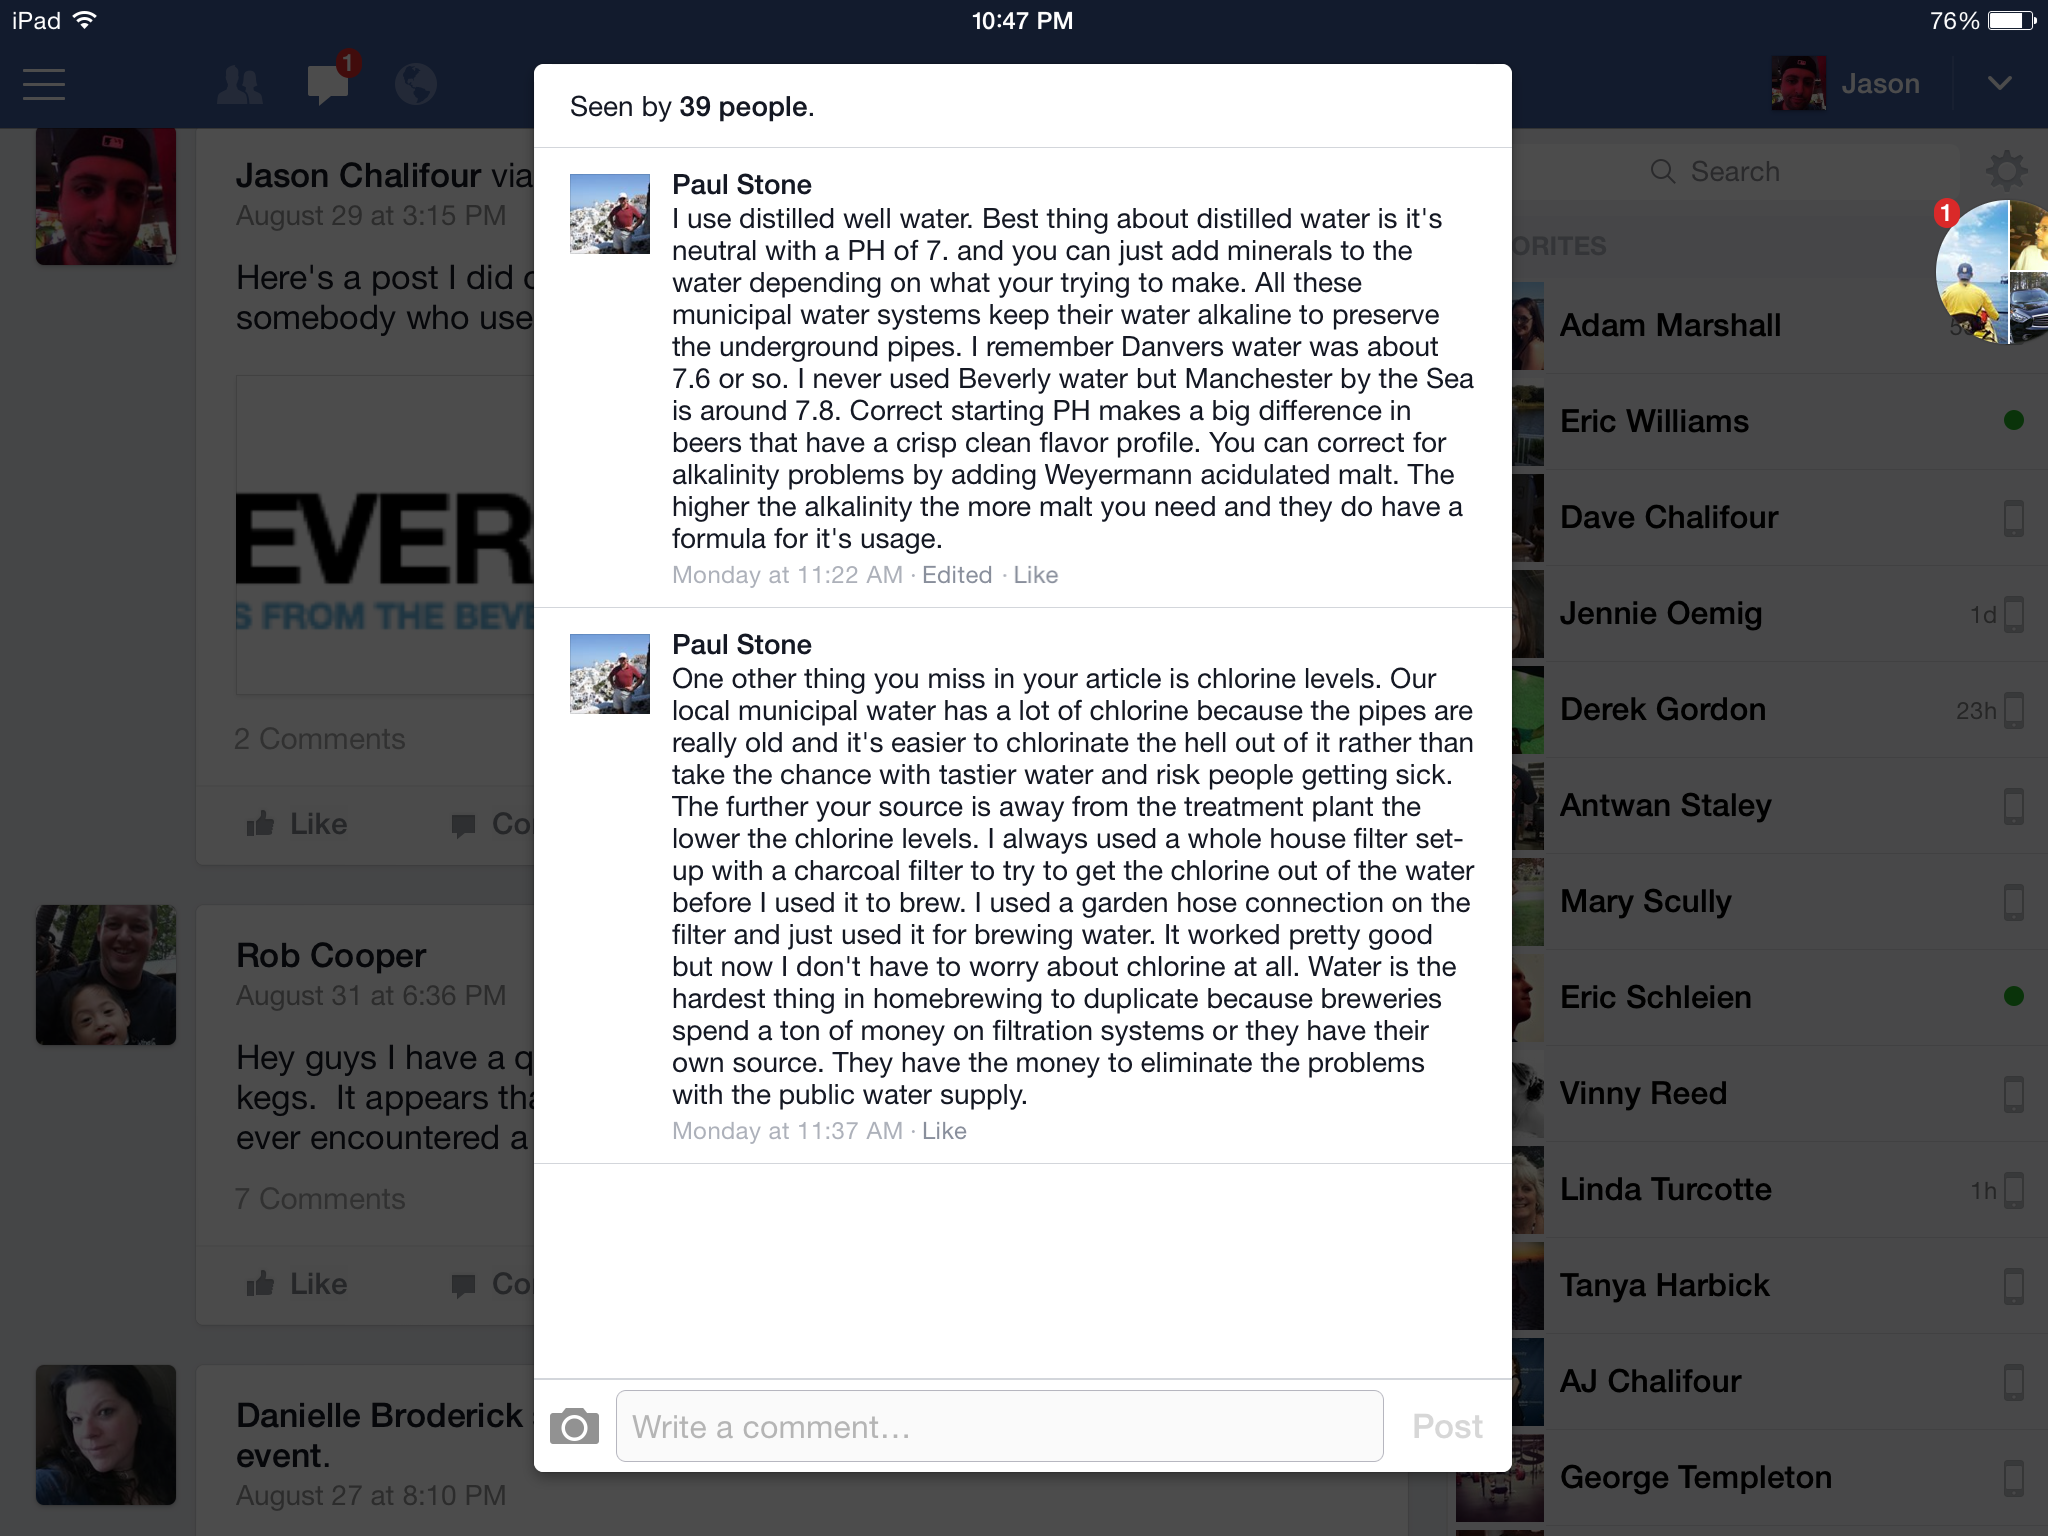
Brewing with Beverly/Salem Water Part II

I shared the post on the North Shore Brewers 
Facebook page because I thought it might be interesting to a group of local homebrewers. I got an interesting and detailed response:

IMG_0081.PNG

Homebrewing can be as involving as you want it to be. It is fair to say after my last post on water chemistry, and specifically how it relates to our local water supply, I've gone a little deeper down the wormhole.